This is an old revision of the document!
Table of Contents
Online Help > AlpineQuest 2.x > Maps & Layers > How to use file-based maps?
How to use file-based maps?
The file-based maps support allows the application to read or import maps from various files, including well-known and commercial map formats.
For most formats, the application will read the map data on-the-fly, directly from the file, but for some particular ones, it will need to import the map data in its own optimized format before displaying it. This process is mostly transparent for the user.
Which file-based map formats are supported by the application?
Here is the list of all supported file formats.
![]() Please check the notes and requirements for each format.
Please check the notes and requirements for each format.
| Supported file-based map formats | Read on-the-fly | Import in *.pgd | Read elevations |
|---|---|---|---|
AlpineQuest Map (*.aqm) Raster map format that can be created with MOBAC (free and multi-plateform map creator, see a tutorial here) and MAPC2MAPC (able to convert a wide range of map formats, free and commercial versions available) | | | |
AplineQuest Map (*.pgd) Fast raster map format created by the application when importing maps from other formats. | | | |
OGC GeoPackage Map (*.gpkg)1 Open, non-proprietary and platform-independent data format for geographic information system defined by the Open Geospatial Consortium. It supports multiple layers and map projections. | | | |
MemoryMap QuickChart Map (*.qct)2 Commercial and proprietary widespread raster map format. | | | |
OziExplorer Map (*.map + *.ozf2 or *.ozfx3)3 Commercial and proprietary widespread raster map format. | | | |
MBTiles Raster Maps (*.mbtile)4 Open source raster map format for storing arbitrary tiled data. | | | |
RMaps SQLite Maps (*.sqlitedb) Simple raster map format using a SQLite database to store image tiles. | | | |
XYZ Zip Maps (*.zip) Zipped raster tiles following the OpenStreetMaps tile server specification. Root folder must be called “ XYZ/”, next sub-level must contain “z” values, then next sub-level “ x” values. | | | |
TMS Zip Maps (*.zip) Zipped raster tiles following the Tile Map Service tile server specification. Root folder must be called “ TMS/”, next sub-level must contain “z” values, then next sub-level “ x” values. | | | |
Google Earth Overlays (*.kml, *.kmz) Raster map format that can be easily created from geo-positioned images using Google Earth. | | see here | |
SRTM data file (*.hgt) Binary format containing elevation data for an area of 1 square degree. Both 1-arc-second and 3-arc-second resolutions are supported. | | | see here |
1. Vector features are not supported.
2. Newer *.qc3“ maps and encrypted maps are not supported.
3. Some *.ozfx3 and newer *.ozfx4 maps are not supported (compatible with Img2Ozf 3.03 and older, MapMerge 1.15 and older).
4. Vector tiles are not supported.
5. Android 3.0 or more required.
How to copy your maps on your device?
The easiest way to put map files on your device is using your USB cable and connecting your device to your computer as a mass storage device. On your computer, browse your device like any USB key using the file explorer.
You can put your maps at any location, including the external SD card.
![]() Be sure that your maps have been entirely copied before un-connecting your device.
Be sure that your maps have been entirely copied before un-connecting your device.
How to select your maps from the application?
Once you have correctly un-connected your device, you can start the application.
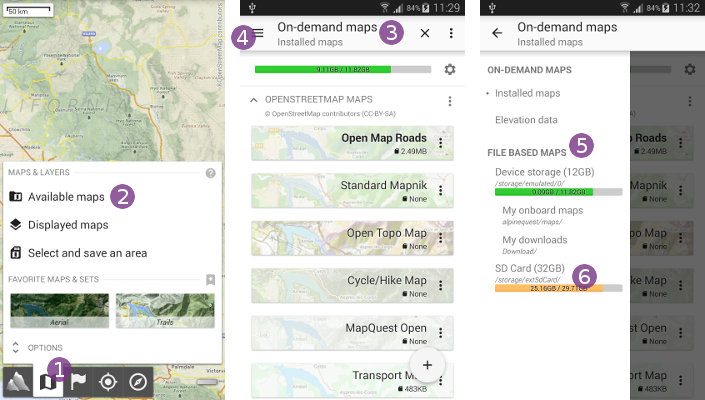
- Tap on the
“Maps” menu and on
 “Available maps” to open the maps explorer;
 - By default, the application lists the on-demand maps
 ;
; - Tap on the left drawer menu
 ;
; - Under the
“File based maps” section, select the folder in which you've put your map file. For example, if you've put your maps in a sub-folder of you external SD card, select
 “SD Card” .
.
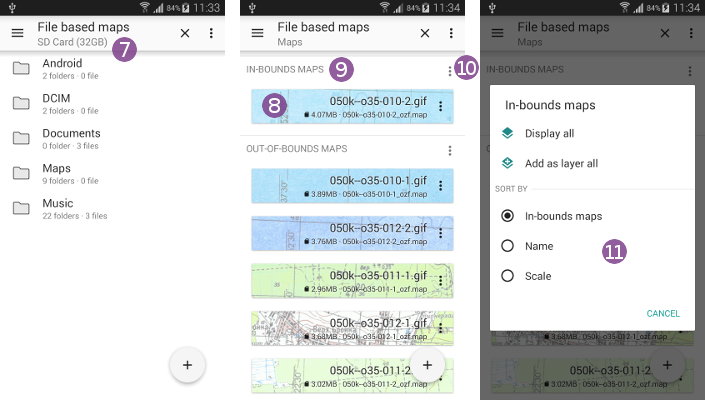
When selecting a folder from the drawer menu, the application will list its content ![]() . If you maps are in a sub-folder, just select it. When a folder containing maps is displayed, they will be listed. Click on a map
. If you maps are in a sub-folder, just select it. When a folder containing maps is displayed, they will be listed. Click on a map ![]() to display it and close the maps explorer.
to display it and close the maps explorer.
By default, maps are sorted in two categories. The “In-bounds maps” ![]() are maps covering the area currently displayed, whereas
are maps covering the area currently displayed, whereas “Out-of-bounds maps” are maps covering an area far away. To change this sort:
- Click on a maps category menu icon
 ;
; - Select the desired sort from the
“Sort by” .
.
![]() When selecting a map from the out-of-bounds group, the application will ask you if you want to slide the view over the area covered by the selected map.
When selecting a map from the out-of-bounds group, the application will ask you if you want to slide the view over the area covered by the selected map.
![]() When sliding the view out of the covered area, the application will automatically search for another map covering the new area in the last displayed folder. If one is found, it will be automatically selected.
When sliding the view out of the covered area, the application will automatically search for another map covering the new area in the last displayed folder. If one is found, it will be automatically selected.
How to deal with multiple maps covering continuous areas?
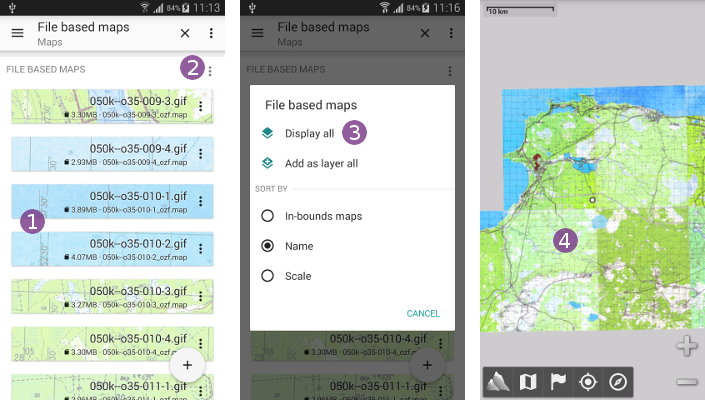
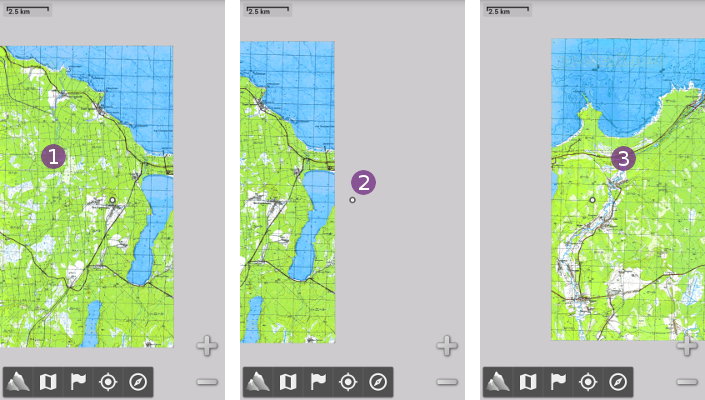
 Some file-based map formats store large areas as multiple maps covering smaller and continuous areas (as displayed in the screenshot on the right). It's often the case when the maps are created from scanned paper maps.
If you put all those continuous maps inside the same folder, the application is able to deal with them in various ways. The maps can even be in different formats.
Using continuous maps auto-loading
When you select a map from a folder containing multiple continuous maps, this one is displayed ![]() .
.
As you slide the displayed area, if the screen center ![]() moves over an area which is not covered anymore by the current map, but which is covered by another map from the same folder, this other map will be automatically loaded and displayed
moves over an area which is not covered anymore by the current map, but which is covered by another map from the same folder, this other map will be automatically loaded and displayed ![]() .
.
![]() For the continuous maps auto-loading to work, only one file based map must be displayed at the same time.
For the continuous maps auto-loading to work, only one file based map must be displayed at the same time.
![]() An auto-loading is also available if you have multiple maps covering the same area with different scales. When using the ”+“ and ”-“ zoom buttons, the application will auto-load the best scale matching map.
An auto-loading is also available if you have multiple maps covering the same area with different scales. When using the ”+“ and ”-“ zoom buttons, the application will auto-load the best scale matching map.
Using the multi-map selection
In order to create a virtually large map areas from small continuous map areas, you can display multiple maps at same time:
- List a folder containing multiple continuous maps
 ;
; - Tap on the file-based maps header menu
 ;
; - Select ”
Display all“ .
.
The maps are all displayed at the same time ![]() .
.
![]() In order to re-display all those maps at the same time after having displayed any other map, you can create a favorite map set.
In order to re-display all those maps at the same time after having displayed any other map, you can create a favorite map set.
