Table of Contents
Online Help > Placemarks > Set of waypoints
How to create a set of waypoints?
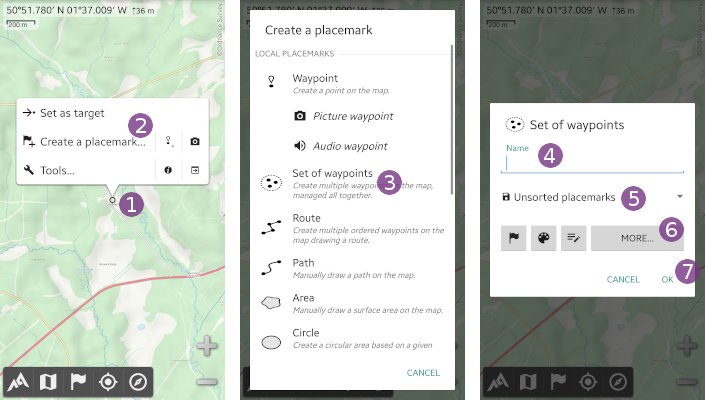
- Tap on the screen center icon
 and on
 “Create a placemark…” ;
; - Choose
“Set of waypoints” ;
; - If desired, type a name in the
“Name” text field;
 - If desired, change the folder
 in which to save the set of waypoints;
 - If desired, change other properties like the color or the icon by tapping on
“More…” ;
; - Tap on
“Ok” to validate.

The edit mode is activated, you can now add waypoints:
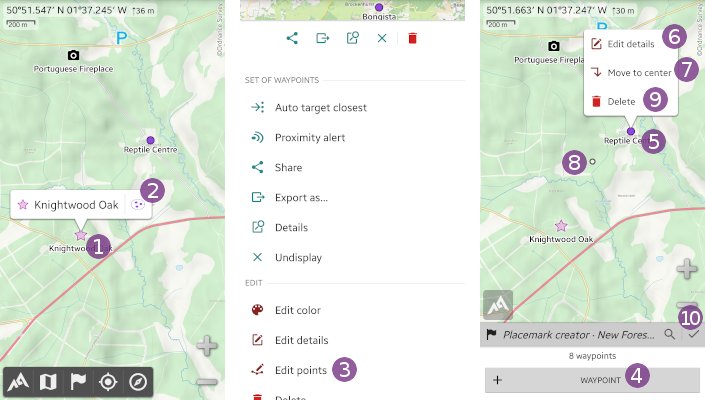
- Move the screen center icon over the location where to add a waypoint and tap on
“Waypoint” ;
; - If desired, type a name for the waypoint in the
“Name” text field and change other properties by tapping on
 “More…”; - Tap on
“Ok” to validate.
The new waypoint is displayed on the map. Add as many waypoints as wanted, and when finished, tap on the “Save & close” ![]() icon.
icon.

How to add, move or delete points of a set?
To add waypoints to a set:
- Tap on any waypoint of the set
 and on the set icon
  right of the waypoint name;
 - Scroll the menu to the bottom and choose
“Edit points” to activate the edit mode;
 - Tap on
“Waypoint” to add waypoints as explained above.
To edit, move or delete an existing waypoint using the edit mode, tap on one waypoint ![]() of the edited set of waypoints, and tap on:
of the edited set of waypoints, and tap on:
“Edit details” to edit the details of the waypoint (name, icon, description, etc.);
“Move to center” to move the waypoint to the screen center
  ;
;“Delete” to delete the waypoint.
When you've done, tap on the “Save & close” ![]() icon to close the edit mode.
icon to close the edit mode.

