Online Help > Maps & Layers > Image calibration
How to calibrate an image to use it as a map?
The application allows you to use regular images as maps. In order to correctly locate items on this map (points, tracks, etc.), the application must know what is the exact area covered, this is done by the calibration process: after displaying the image, you must match 4 points with another existing and correct map. This process is done only one time, then the image is converted as a regular map file.
![]() The calibration process used by this application requires 4 points, which is enough to correctly match an image over a base map without knowing the exact map projection which is used, and gives satisfactory result for maps with limited areas.
The calibration process used by this application requires 4 points, which is enough to correctly match an image over a base map without knowing the exact map projection which is used, and gives satisfactory result for maps with limited areas.
The supported image formats are: JPEG, PNG, BMP1, GIF1, WebP1,2, HEIF1,3.
1: size limit may apply based on your device configuration; 2: Android 4.0+; 3: Android 8.0+
To calibrate an image:
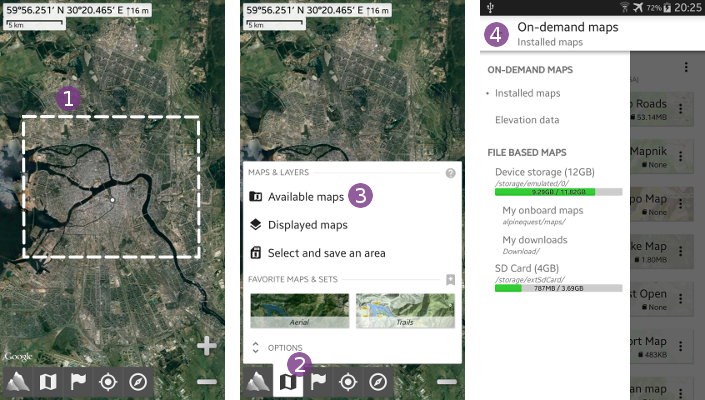
- Select a base map over which one you'll calibrate your image. The application will display the imported image so that it almost covers the current view (as displayed by the white dotted line
 ). To make the calibration process easier, select a location and zoom level that approximately match the area covered by your image before importing it;
 - Tap the
“Maps & Layer” menu and
 “Available maps” to open the maps explorer;
 - Tap the top/left menu
 and under
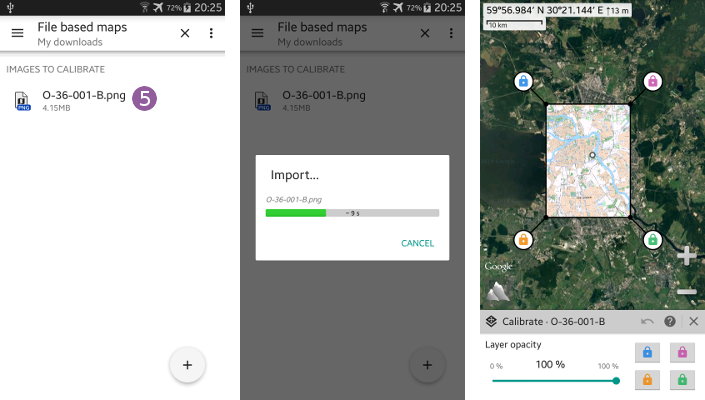
 “File based maps”, select the folder where is located your image. For example, click on“My downloads”if your image has been saved in the downloads folder of your device.

When you've selected the correct folder, tap the image ![]() to start the import process. When the image has been imported, it's displayed over the current map.
to start the import process. When the image has been imported, it's displayed over the current map.
By default, the 4 calibration points are placed on the four corners.

For each calibration point:
- Tap the button of this calibration point
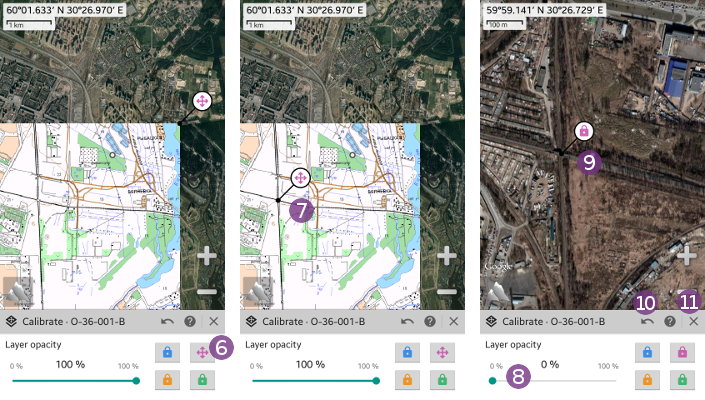
 to select the arrows icon. In this state, you'll be able to move the calibration point within the image to calibrate;
 - Tap and hold the arrows icon on the map
 , and move the calibration point over a map feature that is clearly visible on both the base map and the image to calibrate. Here for example, we choose a railroad crossing;
 - Tap the button of this calibration point
 again to select the padlock icon. In this state, you'll be able to move the image over the base map;
 - Reduce the opacity of the image to calibrate using the opacity slider
 to make the base map visible, and move the calibration point to the correct location
  on this one. Only pay attention to the point to calibrate and ignore other features around: they will only match when the four calibration points are correctly placed.
Repeat those steps for the three other calibration points.
![]() Be careful to choose a map feature that is stable across the two maps and small enough: a railroad crossing, a church, an historical building, etc. Note that some features like riverbeds are not stable: they can move with time.
Be careful to choose a map feature that is stable across the two maps and small enough: a railroad crossing, a church, an historical building, etc. Note that some features like riverbeds are not stable: they can move with time.

In case you make a change by inadvertence, you can use the “Undo” ![]() icon to cancel the last action.
icon to cancel the last action.
When the four calibration points are correctly placed, tap the “Close” ![]() icon to terminate the calibration process.
icon to terminate the calibration process.